Windows proxy settings ultimate guide part III – WPAD/PAC configuration file

  1. History
  2. PAC/WPAD script
  3. Hosting proxy.pac/wpad.dat file
  4. Adding script file to IE/EDGE
  5. Autodetection of script using DHCP and DNS servers – WPAD
  6. P.S

History

The first proxy automatic detection system, called PAC (proxy auto-config), was developed in time of Netscape Navigator (if you are old enough like me you will remember). It allowed you to specify a JavaScript location which told the browser which proxy to use or bypass request. It also provided a central position from which to change proxy servers. In years after, there was a problem with changing script location. Clients needed to change script location manually, or you, as admin, needed to change script location yourself. The solution for this problem is WPAD (Web Proxy Auto Discovery). This is a set of methods for finding the PAC script to be tried in order, leveraging DHCP and DNS services on network. Let start with script itself.

Browser support for WPAD

PAC/WPAD script

A PAC/WPAD file contains a JavaScript function “FindProxyForURL(url, host)”. JavaScript is case sensitive, and IE itself converts the variables url and host into lowercase before the FindProxyForURL function is called. This condition is not true for WinHTTP. This is because WinHTTP passes the host and the url directly to the function. That’s why we need conversion to lowercase in script. If you are familiar with proxy settings up to now all comments in script should be self explanatory. Function returns a string with one or more access method specifications. These specifications cause browser to use a particular proxy server or to connect directly. You can copy this function in any text editor and save it under proxy.pac or wpad.dat file . Names can be different but its usual naming convection you will encounter.

function FindProxyForURL(url, host)
{
 
/* Normalize the URL for pattern matching */
url = url.toLowerCase();
host = host.toLowerCase();
 
/* Don't proxy local hostnames */
if (isPlainHostName(host))
{
return 'DIRECT';
}
 
/* Don't proxy local domains */
if (dnsDomainIs(host, ".example1.com") ||
(host == "example1.com") ||
dnsDomainIs(host, ".example2.com") ||
(host == "example2.com") ||
dnsDomainIs(host, ".example3.com") ||
(host == "example3.com"))
{
return 'DIRECT';
}
 
/* Don't proxy Windows Update */
if ((host == "download.microsoft.com") ||
(host == "ntservicepack.microsoft.com") ||
(host == "cdm.microsoft.com") ||
(host == "wustat.windows.com") ||
(host == "windowsupdate.microsoft.com") ||
(dnsDomainIs(host, ".windowsupdate.microsoft.com")) ||
(host == "update.microsoft.com") ||
(dnsDomainIs(host, ".update.microsoft.com")) ||
(dnsDomainIs(host, ".windowsupdate.com")))
{
return 'DIRECT';
}
 
if (isResolvable(host))
{
var hostIP = dnsResolve(host);
 
/* Don't proxy non-routable addresses (RFC 3330) */
if (isInNet(hostIP, '0.0.0.0', '255.0.0.0') ||
isInNet(hostIP, '10.0.0.0', '255.0.0.0') ||
isInNet(hostIP, '127.0.0.0', '255.0.0.0') ||
isInNet(hostIP, '169.254.0.0', '255.255.0.0') ||
isInNet(hostIP, '172.16.0.0', '255.240.0.0') ||
isInNet(hostIP, '192.0.2.0', '255.255.255.0') ||
isInNet(hostIP, '192.88.99.0', '255.255.255.0') ||
isInNet(hostIP, '192.168.0.0', '255.255.0.0') ||
isInNet(hostIP, '198.18.0.0', '255.254.0.0') ||
isInNet(hostIP, '224.0.0.0', '240.0.0.0') ||
isInNet(hostIP, '240.0.0.0', '240.0.0.0'))
{
return 'DIRECT';
}
 
/* Don't proxy local addresses.*/
if (false)
{
return 'DIRECT';
}
}
 
if (url.substring(0, 5) == 'http:' ||
url.substring(0, 6) == 'https:' ||
url.substring(0, 4) == 'ftp:')
{
return 'PROXY 10.0.40.50:9090';
}
 
return 'DIRECT';
}

Depending on configuration needed you can change script to fit your needs. For example if you have multiple branch offices, or subnets that have its own proxy server installed, you can configure script in next way to reflect your infrastructure

{
if (isInNet(myIpAddress(), "10.1.0.0", "255.255.0.0"))
{ return "PROXY wcg1.example.com:8080; " +
"PROXY wcg2.example.com:8080";
}
 
if (isInNet(myIpAddress(), "10.2.0.0", "255.255.0.0"))
{ return "PROXY wcg1.example.com:8080; " +
"PROXY wcg2.example.com:8080";
}
 
if (isInNet(myIpAddress(), "10.3.0.0", "255.255.0.0"))
{ return "PROXY wcg2.example.com:8080; " +
"PROXY wcg1.example.com:8080";
}
 
if (isInNet(myIpAddress(), "10.4.0.0", "255.255.0.0"))
{ return "PROXY wcg2.example.com:8080; " +
"PROXY wcg1.example.com:8080";
}
else return "DIRECT";
}

There is a lot of examples on the net about possible configuration but if you want to know more about function you can use in if statements visit next sites I consulted while creating this blog post.

https://www.websense.com/content/support/library/web/v76/pac_file_best_practices/PAC_best_pract.aspx

Hosting proxy.pac/wpad.dat file

You need to present your PAC file on some location that is accessible to computers on your network. Usually it is web location hosted on local web service. For our example we will put PAC file on root of default web site in IIS.

Problem you will encounter is next one (see picture below). To correct it you need to add PAC extension to host header mime types.

HTTP error 404.3 hosting pac file

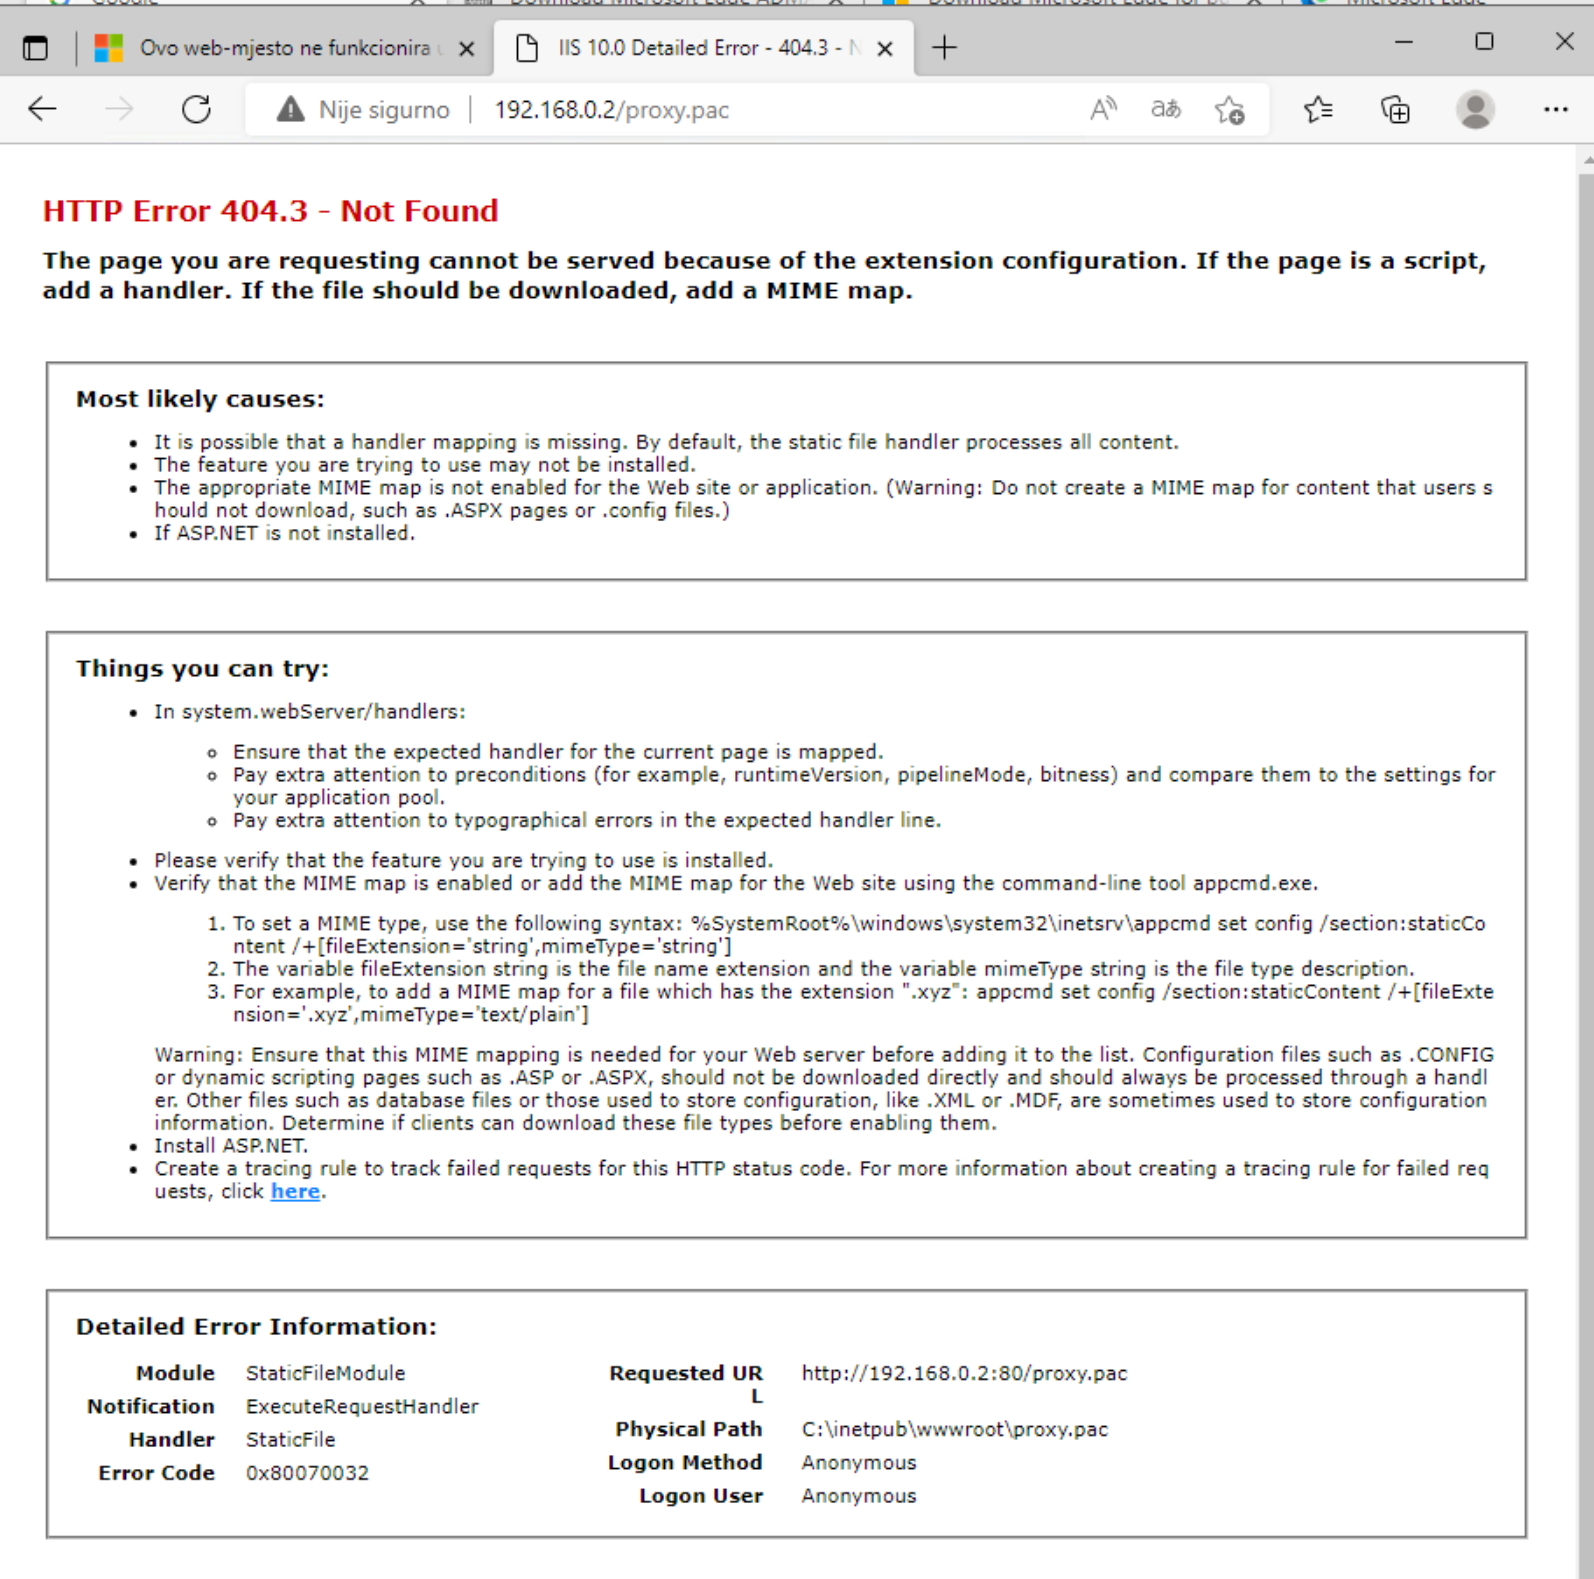
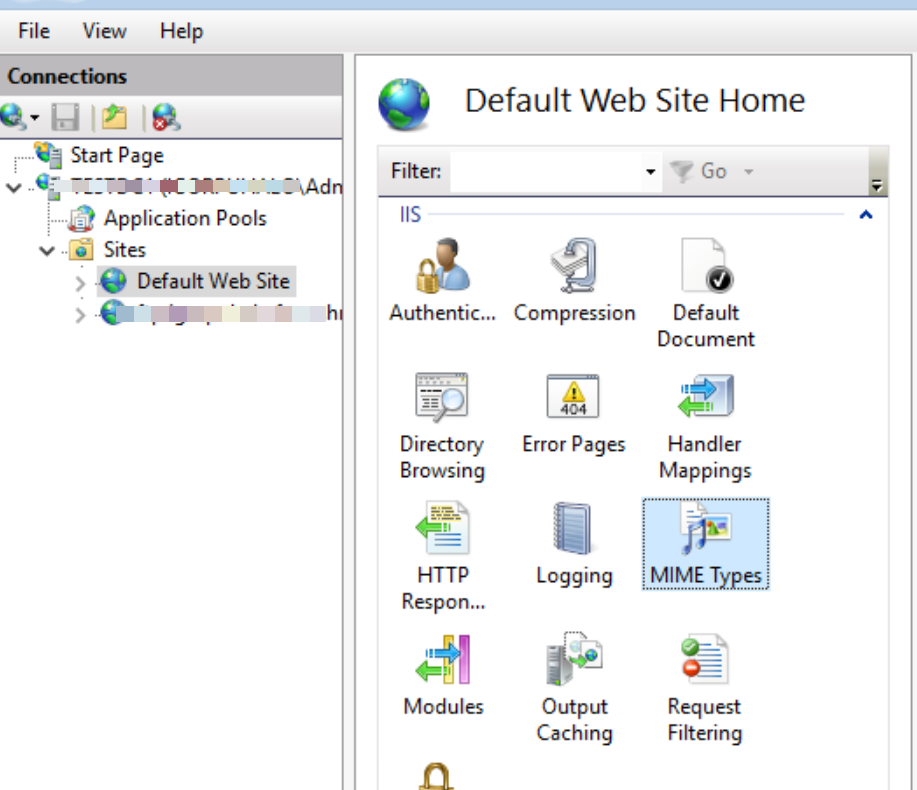
Open IIS manager select website where you hosted pac file and open MIME types presented on next picture

MIME types


Click add to add pac file with next values FileExtension=’.pac’;mimeType= ‘application/x-ns-proxy-autoconfig’

Add pac file to MIME types

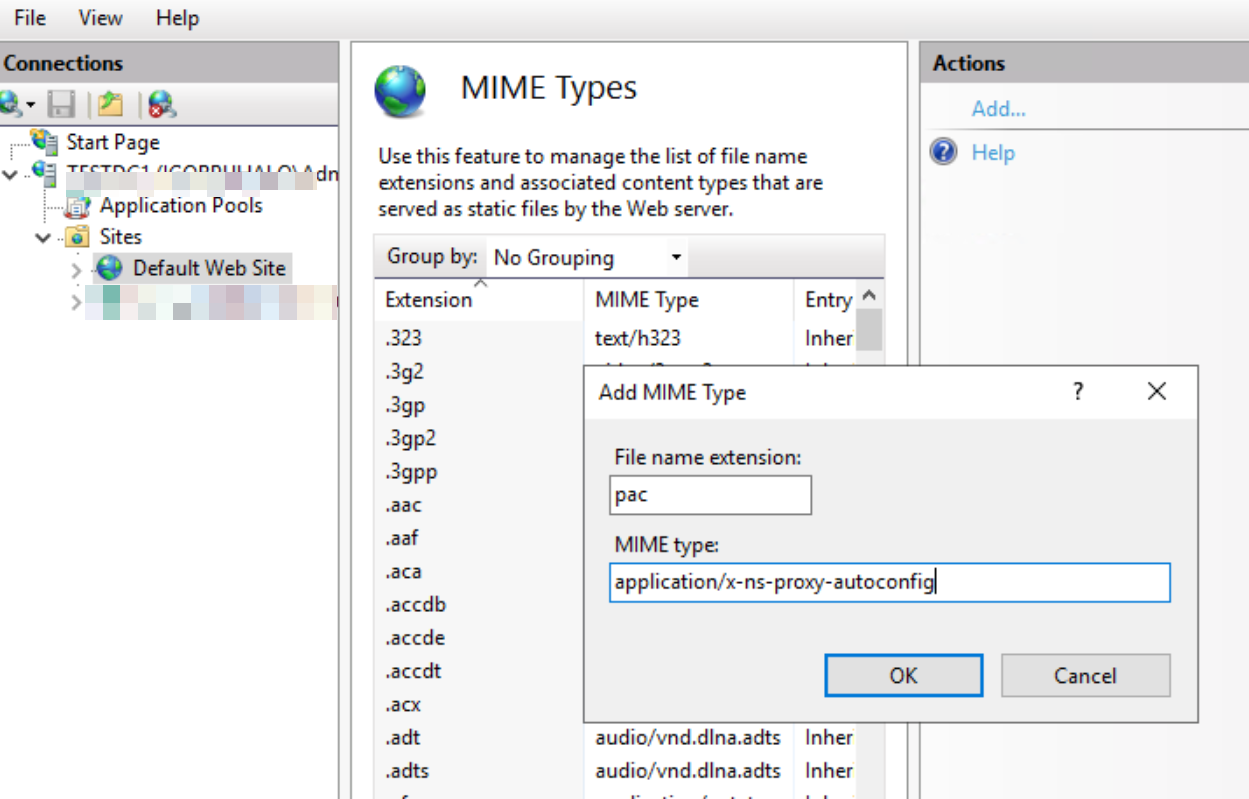
If you are using wpad.dat naming you will need same setting but you need to enter next values File extension: ‘dat’; MIME type: ‘application/x-javascript-config’

You can do same with PowerShell (example)

import-module WebAdministration
md c:\AutoConfig
New-Item 'IIS:\Sites\Default Web Site\AutoConfig' -Type VirtualDirectory -PhysicalPath c:\AutoConfig
add-WebConfigurationProperty //staticContent -name collection -PSPath 'IIS:\Sites\Default Web Site\AutoConfig' -Value @{FileExtension='.pac';mimeType= 'application/x-ns-proxy-autoconfig'

After that client will be able to get PAC file from web location.

Adding script file to IE/EDGE

To use script file you need to add script location resembling example on picture. You can use this config in IE settings also, or deploy it with GPO (refer to part II of this guide)

Proxy setup for pac file publisned on IIS website

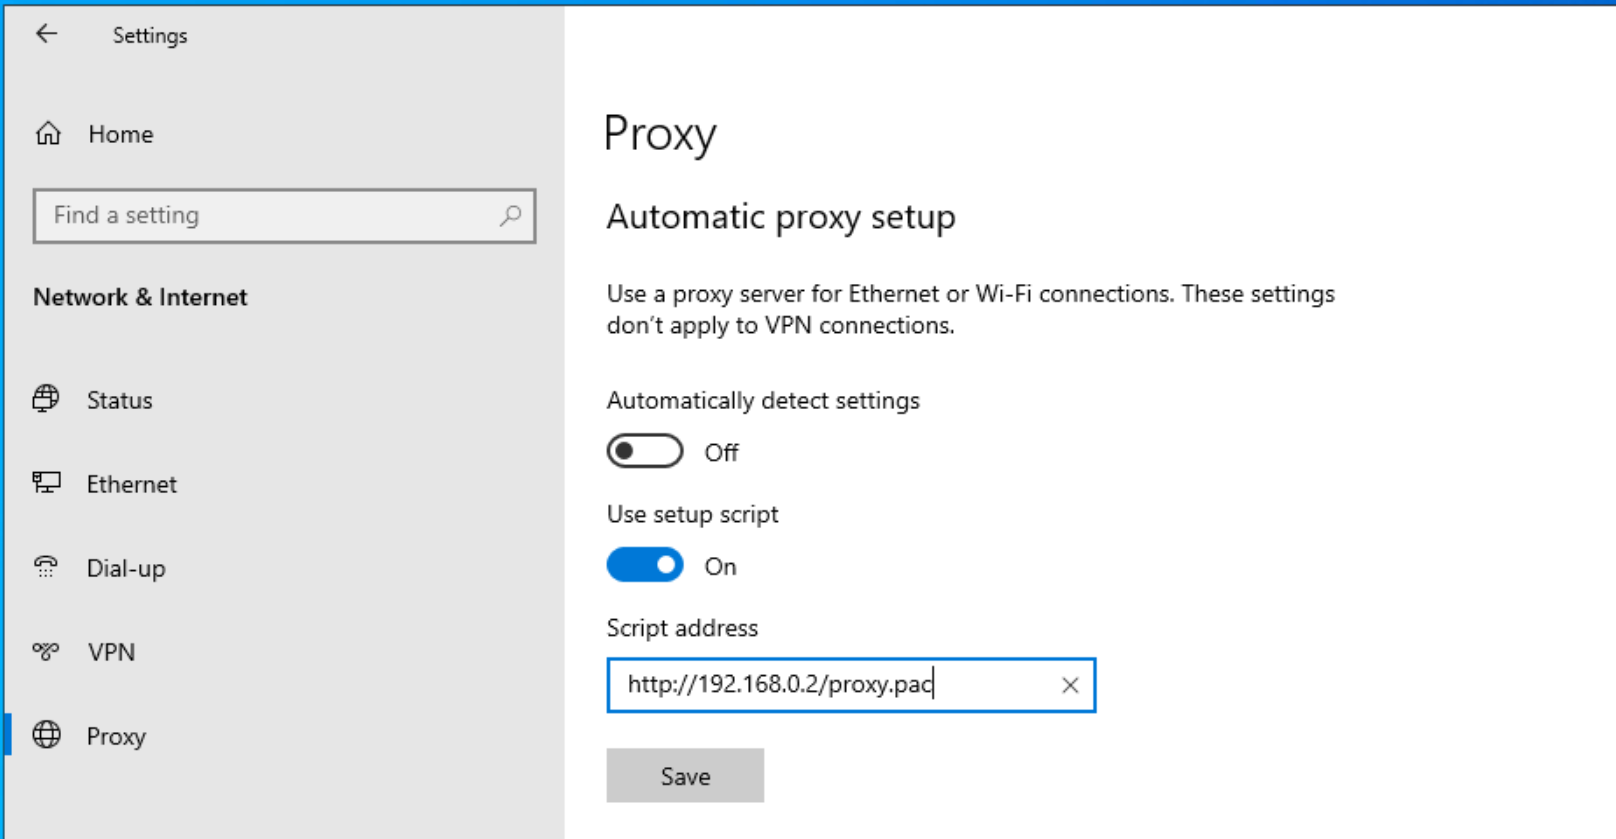
What happens now is that every url you type in browser is evaluated with JavaScript function FindProxyForURL and accordingly, you will use or not use proxy for that url.

Autodetection of script using DHCP and DNS servers – WPAD

If you want to provide same proxy policy to all browsers, and ability to easily change PAC file location to all clients, you need two things:

  • Standard Proxy auto-config (PAC): Create and publish a central proxy configuration file.
  • Autodiscovery Protocol (WPAD) Web Proxy Standard

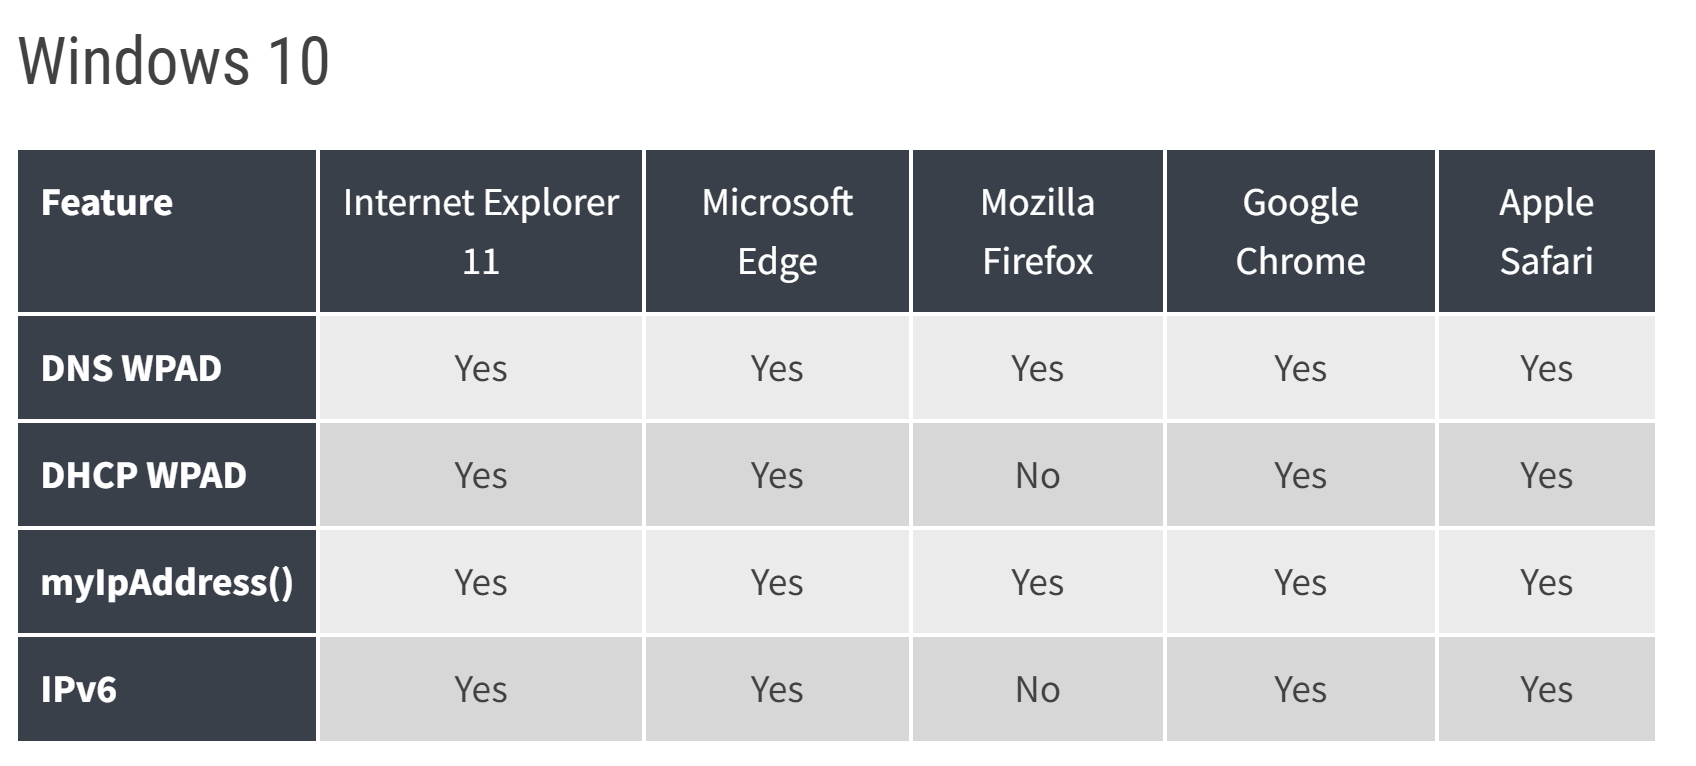
WPAD standard define method to retrieve location of PAC file using first DHCP or DNS if DHCP discovery fail or doesn’t exist (Firefox doesn’t support DHCP WPAD discovery). DHCP has a higher priority than DNS for automatic configuration. If DHCP provides the URL for configuration file, the process stops and the DNS lookup doesn’t happen.

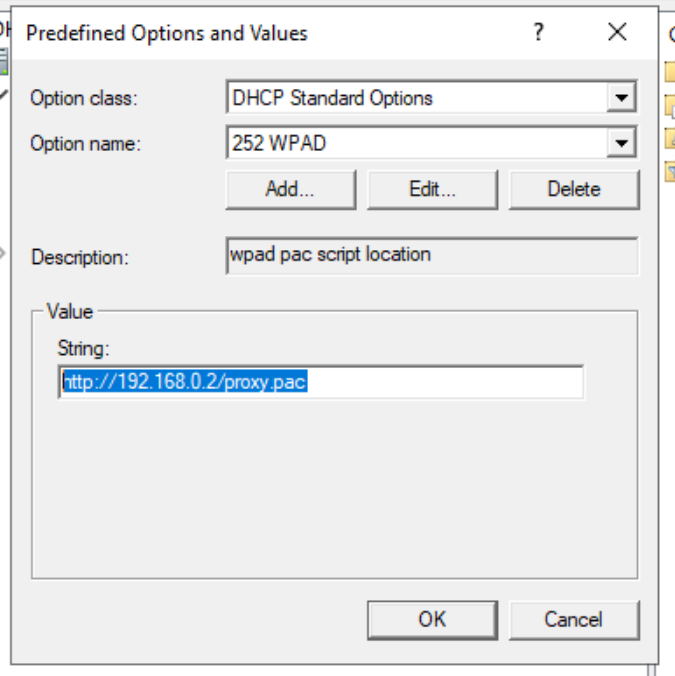
For DHCP to work it need to support DHCPINFORM message, to obtain the DHCP options 252. Let first show configuration of that option on Windows Server DHCP.

First we need to add/configure that option on DHCP server level, and then to add that option to DHCP IP scope of our choice. Open DHCP management tools and right click on IPV4 and choose Set Predefined Options. In new window click Add and enter next values: NameWPAD; Code : 252; Data type select String, and then click OK. In string type URL of PAC file : http://192.168.0.2/proxy.pac. It will be default value for this option. After you create it check for its existence. It should be present like on the picture below.

DHCP option 252

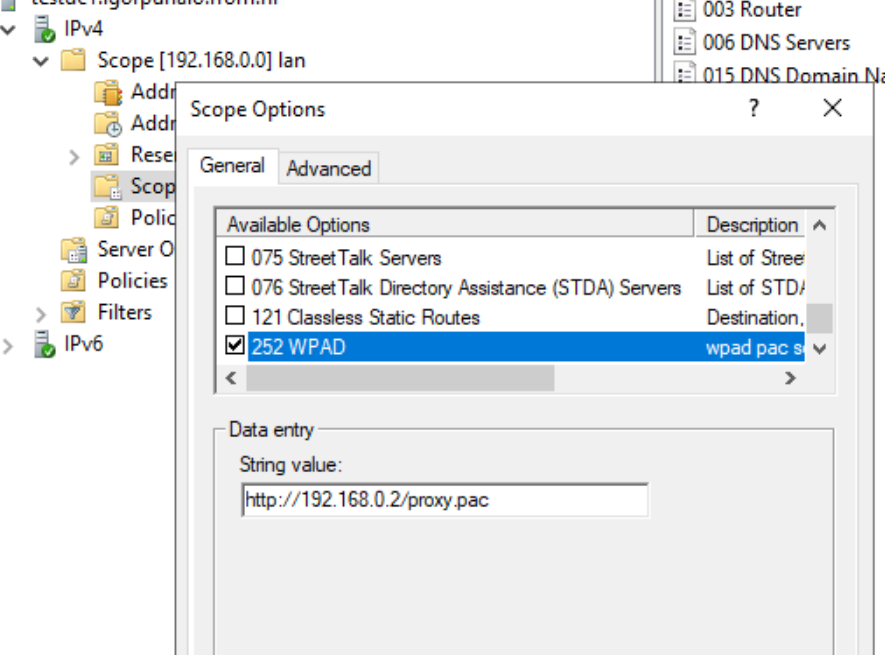
After that you need to turn on created option to IP scope. Right click Scope options, and then click Configure options. Select option 252 from existing list. Default location of script will be presented but you can change it.

Selecting WPAD Scope option

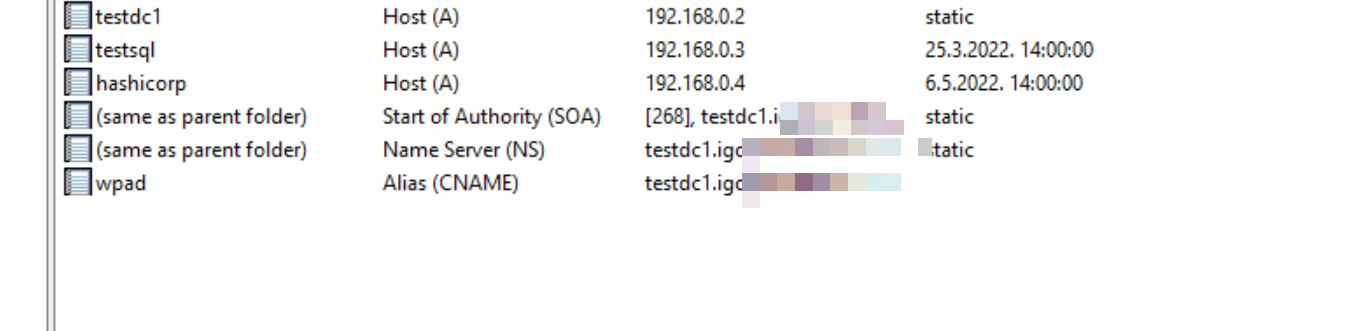
For most of clients or browsers this setting is more than enough (except Firefox), but some clients have static ip addresses and they can not use DHCP. This is part where DNS comes in. If DHCP proxy discovery fails or doesn’t exist, DNS is next stop for WPAD. You need to create alias (CNAME) record in your local domain zone with name WPAD. It means that if your local domain name is contoso.com, client/browser will look for next URLs using WPAD method, trying to find autoproxy configuration file in next order

http://wpad.contoso.com/wpad.dat;

http://wpad.com/wpad.dat

wpad.dat vs proxy.pac

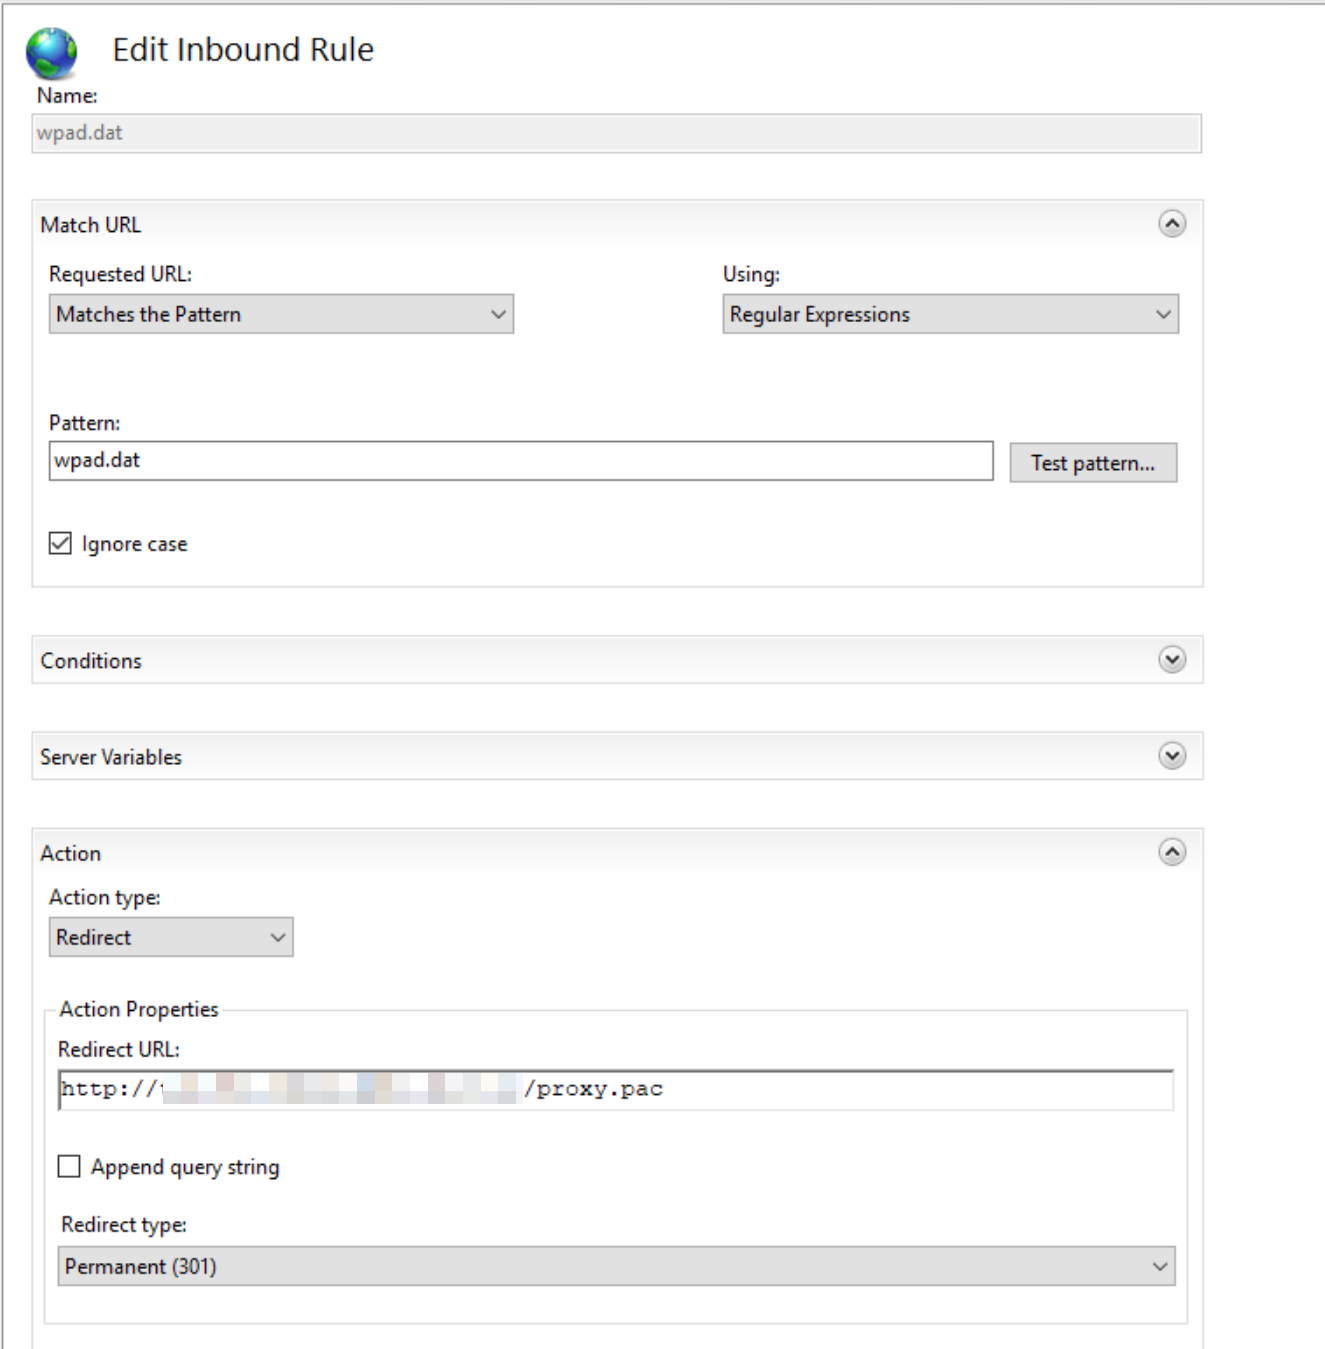
You probably noticed that client is looking for wpad.dat file. In our examples up to now we used proxy.pac naming. It would be beneficial to use wpad.dat file naming, even though, content of the file is same. Main reason is WPAD method mentioned above, where DNS discovery is trying to look for wpad.dat file. You can bypass it with HTTP URL rewrite rule on web site.

URL rewrite rule for wpad.dat

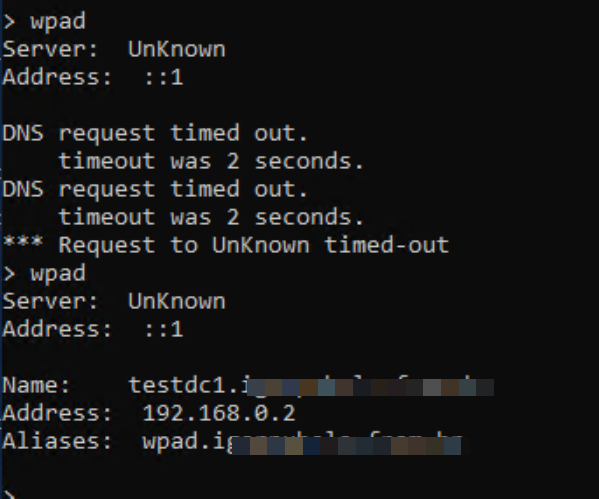
After yu setup everything usually what is happening is that if you try to resolve wpad entry in DNS you get nothing in response. Because of security reasons, and possible hijacking of wpad record in DNS, Microsoft decided to put wpad entry on DNS server global query block list. It exist from W2008 Server. To make it work you need to remove it with next command

Removing wpad grom DNS server global query block list

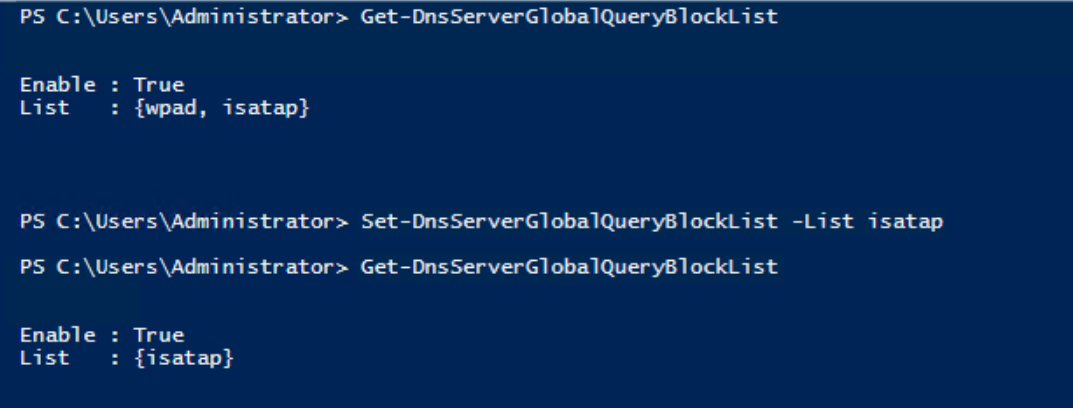
after that your DNS resolution will work

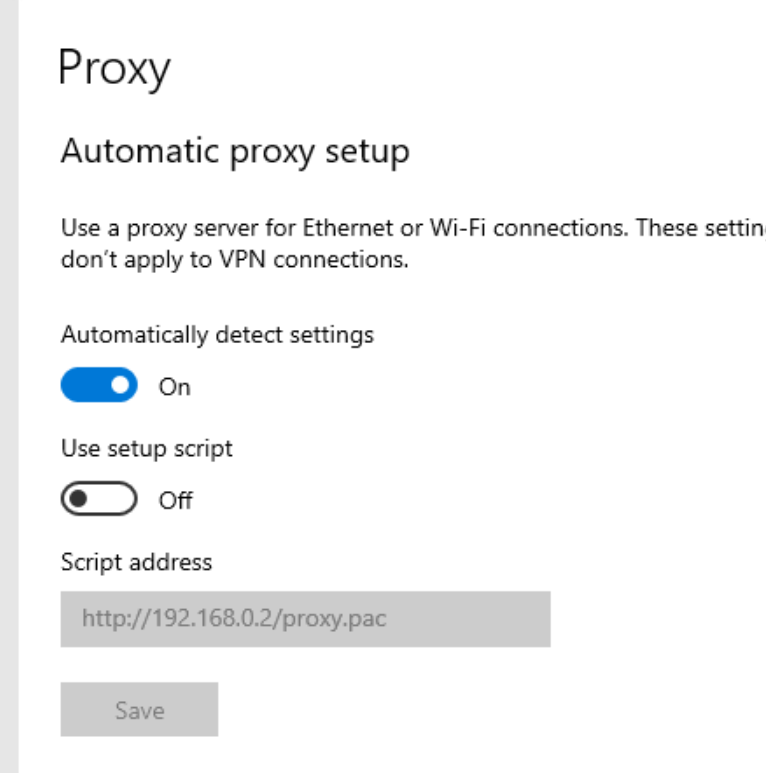
Everything that is left is to click automatically detect setting button in browser or system proxy settings.

This should be the last post of proxy trilogy from me. I was really tired of collecting bits and pieces about proxy setting from around the web. somwhow it turns out it can be a small book. There is some more things about proxy configuration, but I will leave that for readers to discover.

I wish you to enjoy rest of this summer. I am going to use it also on vacation staring next week.

P.S

One more thing you can research is Autoprox.exe utility for testing and debugin your PAC file. Download link

If you like you can read also about optimizing PAC file functions on https://docs.microsoft.com/en-us/troubleshoot/developer/browsers/connectivity-navigation/optimize-pac-performance

Windows proxy settings ultimate guide part II – configuring proxy settings

  1. Setting proxy with GPO
  2. Windows 10 proxy settings
  3. Computer proxy settings
  4. Proxy settings for WinHTTP API
  5. Setting proxy using system environment variables
  6. Prevent user from changing browser settings
  7. Powershell and proxy settings

As of June 2022 Internet Explorer browser reached end of support in Windows OS, and users are advised to use Microsoft Edge in IE compatibility mode. Especially if they have legacy apps running only on IE. Many of the settings we will explain here, related to proxy, are based on usage of Internet Explorer. Despite it, we will address all aspects of configuring proxy settings even it will become “deprecated”.

I took a big byte with this one because I wanted to cover all aspects of working with proxy settings, but it wared me out to check all details. I didn’t want to copywrite things but i wanted really to check what is going on with ceratin settings and how they work. In short, I didn’t wont to give false or deprecated info, but exact and tested information. I don’t know if I succeeded. Please comment and correct me if I am wrong somewhere.

If you read part I , you realize there are two dll-s you can use for Internet access and proxying , with different capabilities. As explained WinINET is user interactive based proxy engine and it has certain capabilities that modern browsers doesn’t have. For example ftp protocol. If you type ftp address in IE you will open ftp site but if you use Microsoft Edge, you will get prompt to open another app for browsing ftp site. In next video you can see that behavior with IE as ftp app.

Opening ftp in Microsoft Edge

There is lot of ways how to configure proxy settings on your PC or server. In this article we will explain how to set proxy with GPO, registry or netsh command. Also we will explain some specific situations and bypassing it.

Setting proxy with GPO

We will start with configuring proxy settings with GPO. We will create GPO and link it to OU.

Note

In previous versions of Internet Explorer (6, 7, and 9) to configure Internet Explorer settings you needed to use the following section in the Group Policy Editor console: User configuration > Policies > Windows Settings > Internet Explorer Maintenance. In Internet Explorer 10 (firstly appeared on Windows Server 2012 and Windows 8) the Internet Explorer Maintenance (IEM) section was removed from GPO Editor.
Create new GPO and link it to companyuser OU

After that we edit created GPO. Navigate to User Configuration > Preferences > Control Panel Settings > Internet Settings and create new Internet Explorer 10 policy (it works for IE 11 also). Navigate to Connections and go to LAN settings

Creating settings for policy

Enter setting for your proxy server in picture. Check box Use a proxy server for your LAN, and then enter IP address and port. Check also Bypass proxy server for local addresses.

There is one thing that you probably noticed on picture. There are green and red lines under different settings presented. Green means that setting is on and will be applied, and red means it is disabled. To toggle this settings use function keys

  • F6 – enable selected option
  • F7 – disable selected option
  • F5 – enable all options on selected tab
  • F8 – disable all options on selected tab

Bypass proxy settings for local addresses

This is very misunderstood setting. It means if you type http://intranet in your browser it will not use proxy to access web site. Local addresses are all URLs that doesn’t have domain suffix.

Regarding bypass, if you type http://intranet.contoso.com or http://192.168.0.34 it is not local address, and browser will try to use proxy to access it. That’s why it is usual to list your local domain and local addresses in exceptions on advanced tab. Use wildcards presented on picture example.

Using Exceptions to bypass proxy for specific domain or IP address/range

After GPO is applied, settings are presented in IE. If you have different proxy for different branch office-s aka LAN subnets you can use Item level targeting to use different proxy settings for different subnets. (I will not go into that area, but sometimes it is necessary. For example when using wpad or pac scripts for configuring proxy you will see it is common part of script configuration. We will talk about that in separate posts)

Applied settings in IE

Windows 10 proxy settings

Windows 10 introduced new modern settings Control Panel where you can set up different computer settings. But still, it is just presentation pane. If you enter manually proxy settings here, you will have new entries in registry user path we talk about in next chapter. If you use GPO, proxy settings will be presented here because it will be read from the same location in registry. You can see words in red “some settings are managed by your organization“, if GPO is applied. Just to explain Microsoft Edge is using these settings, despite it is using WinHTTP API for accessing Internet. It is that setting in browser “Use system proxy settings” you can see in Chrome, Mozilla and similar browsers.

Windows 10 proxy settings

Setting proxy -registry settings

What happens when GPO is applied? It change registry settings. If you browse to registry key on picture, you will see all the same settings you configured on GPO

Proxy settings – registry

It means that you can also set user proxy settings by editing/adding registry keys. For example you can run this PowerShell script and set proxy settings for user. If keys doesn’t exist, please use New-ItemProperty instead of Set-ItemProperty.

$reg = "HKCU:\Software\Microsoft\Windows\CurrentVersion\Internet Settings"
Set-ItemProperty -Path $reg -Name ProxyEnable -Value 1 
Set-ItemProperty -Path $reg -Name ProxyServer -Value "10.0.40.50:9090" 
Set-ItemProperty -Path $reg -Name ProxyOverride -Value '*.contoso.com;<local>'
Set-ItemProperty -Path $reg -Name AutoDetect -Value 0

It is possible to create same registry settings with GPO also. Navigate to GPP section in GPO and create same registry keys from script. Location of settings is User Configuration > Preferences > Registry. Add next values to HKCU:\Software\Microsoft\Windows\CurrentVersion\Internet Settings registry path

  • ProxyEnable (REG_DWORD) = 00000001;
  • ProxyServer (REG_SZ) = 10.0.40.50:9090;
  • ProxyOverride (REG_SZ) = *.contoso.com;<localhost>

Computer proxy settings

All settings we talked about are user proxy settings. If you need to setup proxy to computer object and all users logging into that computer, you need to configure two additional GPO settings. First one is Make proxy settings per-machine (rather than per user). It is located at Computer Configuration > Administrative Templates > Windows Components > Internet Explorer. When you enable this policy all users using that computer will have same proxy settings. Second setting need to override any user GPO policies it has in place. You need to enable Configure user Group Policy loopback processing mode located at Computer Configuration > Policies > Administrative Templates > System > Group Policy.

Make proxy settings per machine policy can be turned on also by registry setting . You will need to add next key on location in script.

$reg = "HKLM\Software\Policies\Microsoft\Windows\CurrentVersion\Internet Settings"
New-ItemProperty -Path $reg -Name ProxySettingsPerUser  -Value 0

For non domain-joined computers you can also use Make proxy settings per-machine GP locally. What is interesting is that you need to setup proxy settings in that way that you run IE but Run as Administrator. After that go to internet options in IE and configure all settings needed. What happens is that from that moment on, any user of that PC can change proxy settings, but if she/he open that window again proxy settings you entered as administrator will remain.

I checked what is happening in registry settings and what I discovered that somehow all Internet settings for proxy are changed in registry with entered values, but I didn’t catch a process that is changing all the values in registry. In any case result of this setting is also that if you try to change proxy setting as normal user setting is not changed. Wathc the video

Changing IE proxy settings on workgroup computer with Make proxy setting per machine ON

Proxy settings for WinHTTP API

As we already mentioned in part I there are two different API-s used for accessing Internet over proxy. One of them WinHTTP API need its own separate proxy settings . Settings we talked about in chapters before This service also has add-on WinHTTP WPAD service that is used for configuring proxy settings using wpad script.

For system-wide proxy settings that is using this API you can use netsh command. This setting will affect all applications including Windows services which use WinHTTP API with default proxy. For example Windows Update service will not work if you are behind proxy and didn’t set this up. Syntax of this command, that you run in command shell is:

netsh winhttp set proxy 10.90.112.50:9090 "*.contoso.com;<local>"
netsh winhttp show proxy

After you run this command you will see proxy settings with show proxy command and it will look like this.

WinHTTP proxy settings

<local>

this entry correspond to Bypass proxy server for local addresses setting

These settings will be saved in the WinHttpSettings parameter under the registry key HKEY_LOCAL_MACHINE\SOFTWARE\Microsoft\Windows\CurrentVersion\Internet Settings\Connections.

netsh proxy settings in registry

You can set this proxy setting with GPO using registry wizard. Open new GPO nad navigate to Computer Configuration > Preferences > Windows Settings > Registry > New > Registry Wizard.

Select Local computer and specify the path to the WinHttpSettings parameter. Select setting and click finish. It will copy registry binary setting from your local PC to group policy entry.

netsh proxy settings using GPO

Just to clarify that there is also two same settings under Connections Key with differnet names DefaultConnectionSettings and SavedLegacySettings among different registry keys. On this link you can find more about using this keys, and some help in quickly changing binary for turning on or off some common proxy setting values . For example If “Manual proxy” is checked – 9th byte value is “03

Registry wizard rule for netsh proxy setting

Setting proxy using system environment variables

With new .NET Core cross platform language and general Windows love Linux attitude, you can now use environment variables for setting proxy. I first discovered this possibility when i tried to debug why certain web application is using proxy when it shouldn’t. For all apps that are using Linux like http_proxy, https_proxy entries you can now set it up. This change came with .NETcore 3.0. You can check when it all started on this link . If I am wrong please correct me. I didn’t had to much time to investigate

The environment variables used for DefaultProxy initialization on Windows and Unix-based platforms are:

  • HTTP_PROXY: the proxy server used on HTTP requests.
  • HTTPS_PROXY: the proxy server used on HTTPS requests.
  • ALL_PROXY: the proxy server used on HTTP and/or HTTPS requests in case HTTP_PROXY and/or HTTPS_PROXY are not defined.
  • NO_PROXY: a comma-separated list of hostnames that should be excluded from proxying.

New apps are using these environment variables first, and if they don’t exist user proxy settings are used. Please check this link for more details. What is interesting that PowerShell 7 is also using this feature.

If you see entries on the picture in your Windows installation check with you development team 🙂

http_proxy Enviroment variables

Prevent user from changing browser settings

Even if GPO is applied to IE, netsh or any other proxy settings, users can change any of the proxy settings. Whatever change is, GPO will still overwrite user changed settings, because GPO’s are applied on regular bases in every domain.

You can prevent users from changing user proxy settings utilizing GPO “Prevent changing proxy settings”. This parameter is present in both the user and computer GPO sections under next locations

  • Computer Configuration > Policies > Administrative Templates > Windows Components – Internet Explorer
  • User Configuration > Policies > Administrative Templates > Windows Components Internet Explorer

Settings in the Computer Configuration section take precedence over user settings.

Prevent changing proxy settings GPO
Disabled proxy settings using Prevent changing proxy settings GPO

Powershell and proxy settings

When using PowerShell there is some recommendation what proxy settings should be used/configure. This is table about recommended proxy settings taken form this Microsoft link

PlatformRecommended Proxy SettingsComment
Windows PowerShell 5.1System proxy settingsDo not suggest setting HTTP_PROXY/HTTPS_PROXY environment variables.
PowerShell 7 on WindowsSystem proxy settingsProxy could be configured by setting both HTTP_PROXY and HTTPS_PROXY environment variables.
PowerShell 7 on macOSSystem proxy settingsProxy could be configured by setting both HTTP_PROXY and HTTPS_PROXY environment variables.
PowerShell 7 on LinuxSet both HTTP_PROXY and HTTPS_PROXY environment variables, plus optional NO_PROXYThe environment variables should be set before starting PowerShell, otherwise they may not be respected.
Recommended Proxy Settings by Powershell version

To find out what proxy settings is using PowerShell you can use this command

[System.Net.WebProxy]::GetDefaultProxy()

For some more info please check this link

I next part I will cover configuring proxy settings using WPAD/PAC scripts. i hope it will not be long and daunting task like this one. See you

IPAM DHCP integration script problems aka Microsoft.IPAM session configuration

If you try to test Microsoft IPAM feature you were probably surprised that IPAM  is not getting DHCP leases automatically. For that to work you need to download script from next links

Windows Server 2012 R2 script version 

Windows Server 2012 script version

Please read manual carefully Smile But soon after you try to run all of this,  you can get error like this in Powershell

“The WS-Management service cannot process the request. Cannot find theMicrosoft.ipam session configuration in the WSMan: drive ”

Resolve it by doing folowing action :

Reason for issue:

    Possibly the Microsoft.ipam ps session configuration is missing from the ipam server.

Resolution:

  • Log into the ipam server
  • Launch a powershell window with administrator privileges
  • Execute the following commands:
  • New-PSSessionConfigurationFile -Path ./ipam.pssc
  • Register-PSSessionConfiguration -Name Microsoft.ipam -Path .\ipam.pssc
  • Set-PSSessionConfiguration -name Microsoft.ipam –ShowSecurityDescriptorUI
  • Add the following groups from the local machine scope:

        IPAM Administrators

        IPAM ASM Administrators

Make sure they have full control privileges.

  • Get-PSSessionConfiguration *ipam

Now you should be able to see the Microsoft.ipam ps session configuration

Run your script Any after that you should see DHCP leases in console

Invoke-IpamDhcpLease -IpamServerName localhost -DhcpServerFqdn dhcpcluster2.contoso.com –Force

How to install Putty with PowerShell?

Lately I am very keen on learning DSC and I am using Microsoft Virtual Academy tutorial Getting Started with PowerShell Desired State Configuration (DSC). In last lesson there is Linux DSC configuration task, and application I needed to install was Putty. OK I said! Lets do it with PowerShell.

What is OneGet? It is package installer that give you ability to browse, install, update and uninstall software packages from online or local provider. It is what Linux have long time ago (APT-Get –Debian, yum – CentOS ….) I already had installed WMF 5.0 (aka PowerShell 5.0) and OneGet module . You can find all instruction and downloads on links I provided.

How it works. I stole this part from this blog just to show workflow but you can read it all if you like.


Workflow

From my understanding this is how the OneGet module interact with the package manager like Chocolatey.

  1. Load OneGet module in PowerShell. OneGet is the common interface for interacting with any Package Manager (Plugins).
  2. Then use a Provider for each Package Manager that plugs into OneGet. (Providers do all of the actual work, fetching content from the repositories and doing the actual installation.)
  3. The package manager will then query its software repository to retrieve the package. In this example Chocolatey use it’s own set of Cmdlets (see below in this post)
  4. The package manager then download a configuration file OR get the URI where it will find the instruction to install the package. In the case of Chocolatey, a configuration file is downloaded from the repository and saved locally in C:\Chocolatey\lib\<APPNAME>\Tools,
  5. The Provider will then execute the configuration file and download the actual software (+ its dependencies) from a repository, and obviously install it…. silently 🙂

OneGet_Workfow_v8


Lets do it. If you have all set up run this line

find-package *putty*

image

As you can see there is a list of all putty software packages available. we will jus simple use

install-package putty

image

image

It will install automatically putty and putty portable like software dependency. I was already installing putty so folders already existed, but first time install it will be created. So where it is. You can find all package installations under c:\chocolatey\lib by default. If you want to install software under different folder you can use –Destination parameter  in install-package command

Lets go find putty

image

Run it and V’oila . Putty is there

image